FRS/GMRS Radio Primer UPDATE!

FRS/GMRS Radio Primer UPDATE!

This is an update to the previously posted FRS/GMRS Radio Primer article by John Beaston.

In its May 2017 meeting, the FCC made significant changes to the FRS and GMRS services. These rule changes are basically good news for NETs. Here’s a summary of the changes:

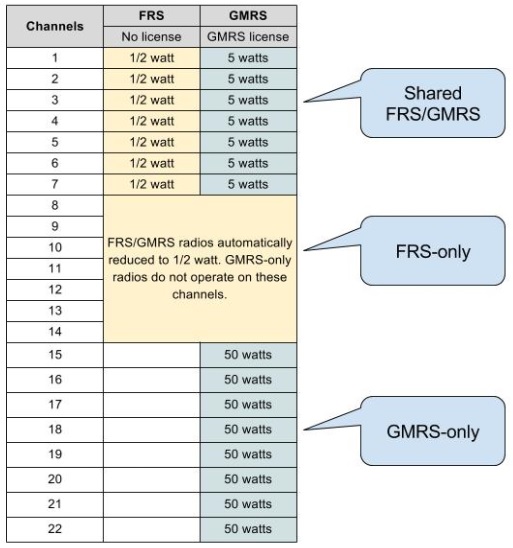
With the stroke of the pen, most hand-held, walkie-talkie combo FRS/GMRS radios will be reclassified as FRS-only radios. This was accomplished by raising the FRS maximum power level regulation to 2 watts (which covers the HIGH power setting on many radios) and by expanding the allowed FRS channels to include all 22 channels. These regulatory changes fold most existing radios under the FRS umbrella. And since the FRS service has no license requirement, any NET will be able to use any of the 22 channels.

What happened to GMRS? Well, it’s still there for those wanting higher power levels, detachable antennas and/or repeater operation. The GMRS channels now overlap the FRS channels so the two services can inter-operate on all 22 channels. GMRS users can still use up to 50 watts, have detachable antennas, and operate repeaters. As previously, a no-exam, $65 license is required but the license term has been extended from 5 to 10 years. As before, a call sign is issued and transmissions must be identified every 15 minutes. Basically, the potential for unwanted interference is so much greater with 50 watts, repeaters, and the potential of larger, higher antennas, the FCC wanted to be able to identify a user if it became necessary.

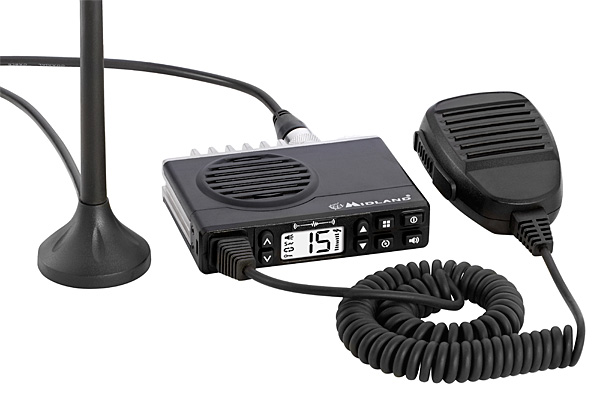
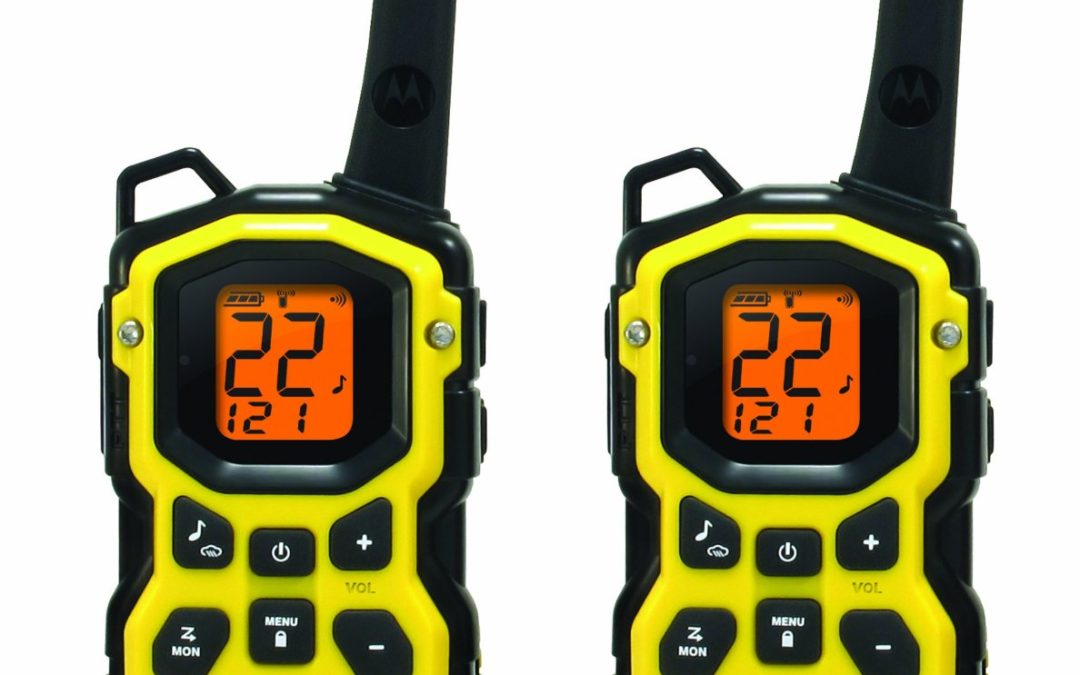
Note that higher power combo radios (such as the Midland GXT1000) and radios supporting repeater operation (such as the Motorola MS350R) will be reclassified as GMRS. A GMRS license would be required to operate these radios.

Eventually there will be no more combo FRS/GMRS radios. Any particular radio will be classified for one service or the other. The new rules took effect at the end of Sept 2017. Some provisions for manufacturers are phased in over 18 month to two years. This allows manufacturers to clear inventory, adjust marketing and develop new products.

Special Note on wide-coverage radios for NET

BaoFeng (and other wide-coverage walkie-talkie) radios are still not legal for transmitting on FRS or GMRS channels. The FCC ruling acknowledges that such radios exist however they explicitly deferred allowing their use on FRS or GMRS.


Written by John Beaston
Overlook NET ARO

What I’ve Learned About Water Storage

What I’ve Learned About Water Storage

The part of my personal preparedness that has taken me the longest to complete, and given me the most confusion, is water storage. I’ll share what I’ve learned so far, to help all the other confused procrastinators out there.

First I tried buying water in gallon containers or saving extra water bottles. A few got leaks as they got jostled around during camping trips, and I discovered their thin skins are best kept safe inside sturdy plastic containers and not moved a whole lot.

My ultimate goal was to store tap water in large quantities because of my aversion to paying for overpriced water from a corporation that might be taking it from a community that needs it more (see: Nestle/Cascade Locks water disputes). We have great water quality in Portland, anyway. But I wasn’t sure what kind of containers to use or how to sanitize them properly.

As I had a lot of glass mason jars on hand already, I decided to “can” my water. I used a sanitizing spray that I’d bought for kombucha-making on the jars and their lids. I filled them with water and put them inside a very heavy duty plastic bin from Home Depot in my basement. A couple months later, after learning more about the importance of sanitizing, I started doubting the integrity of my jar/lid seal (they didn’t have rubber seals), and decided to try a different method.

I found myself at REI with some dividends to spend and a sale going on. I knew I wanted to get some preparedness supplies, so I got the only water containers left – two 14-gallon containers that were quite large. I knew I needed to get up to that 14-gallon minimum because of the 1 gallon/day/person for two weeks rule of thumb. When I got home, I filled them up with water and left them in the basement. Later on, I learned you have to sanitize the containers with a touch of bleach before you add the water. So I poured them out, let them dry, and started over.

Eventually my boyfriend and I took the time to do it right. I got my instructions from the video How to Store Your Own Emergency Supply of Water, which was made by the Regional Water Provider’s Consortium. After following their instructions, we had our own take on things:

WHAT WE LEARNED:

  • It would be best to get water containers that fit into the kitchen sink so you can pour it directly from the tap into the container. Mine were too large, so we had to sanitize a pitcher, then pour it into the container. Also, I didn’t realize how heavy they would be once filled – I could barely carry them. Water is 8 lbs a gallon, so you know, you do the math.

  • Alternatively, a hose connection could reach from the spigot to the container. Ideally, a split connection with a timer, so you could just set it and come back to it when it was done. I know that homebrew stores have hoses because I dabbled with kombucha making, and that’s partially how I started learning about water storage.

  • You may have to do this sanitizing process every six months for the rest of your life (see below). So you should label your containers with the date you filled them. Since this process is time-consuming, streamline it as much as possible. Get that hose, or smaller container, so it’s easier for you to do it. We didn’t think the step of rinsing with soapy water was really necessary since the bleach rinse comes right after. The only way to tell if the sanitizing really worked is to check the water for scuz and taste it the next time you repeat the process in six months.

  • If you’re bottling water yourself, many recommend that you change it out every 6-12 months. Or you could add 1/8 teaspoon of chlorine bleach per gallon of water stored. This precaution will protect you against any lingering organisms that may have been inadvertently missed during the cleaning and/or filling process.

  • You don’t need to change it out every six months if you’re using commercially bottled water. Plastic may leach into your water over time, but in a true emergency it’s better to have more water than less, and short-term exposure to plastic will probably be the least of your concerns.

  • Most of us need to drink about two quarts of water per day to stay healthy. That’s half a gallon. When you’re stressed and/or working hard, you need even more to stay healthy. Living on a gallon of water per day (for drinking, cooking, and cleaning) is actually pretty challenging. While 14 gallons per person is a good starting goal, consider storing more. Much more. You’ll likely never say, “I stored too much water.”

  • If the thought of rotating your water supply overwhelms you or in any way prevents you from storing more water than you currently have – forget about it. Just get more and let it sit. You can always add bleach to it after a disaster strikes if it seems icky.

The photos seen here are of my boyfriend Matt filling the containers in the kitchen. We had to sanitize a pitcher to get the water in, which was inefficient. We’re considering getting a hose attachment. Matt puts the containers with our food storage, camping supplies, twin buckets, and my NET gear, under our basement stairs. The wine rack is also part of the emergency supplies 🙂

Want to help encourage others to store water? Take the #14GallonChallenge!

Katy WolfWritten by Katy Wolf
Team Leader, Boise/Eliot/Humboldt Neighborhood Emergency Team
Exercise & Training Coordinator, Portland Bureau of Emergency Management

FRS/GMRS Radio Primer UPDATE!

FRS/GMRS Radio Primer

FRS/GMRS radios are the go-to radios for most intra-team NET communication. Every NET member should have one in their go-kit. Here’s what you need to know about the world of FRS/GMRS to be an effective (and legal) FRS/GMRS operator. There is also some buying advice for those who still need to get their radio.

The Services

FRS and GMRS are two overlapping radio services defined by the FCC.

FRS (Family Radio Service) is free, and no license is required. It offers a short range of operation due to low power and antenna restrictions.

GMRS (General Mobile Radio Service) covers a much farther range through higher power and the options of external antennas and repeater operation. However, it requires a license. The license is $65 for 5 years with a simple, online application. There is no exam. The license covers your entire “family.”

The services have 22 channels – some are shared and some are exclusive for the particular service.

Being Legal

It is your responsibility to operate your radio in a legal manner.

  • If you do not have a GMRS license, you may only operate on channels 1-14 and only with low power.
  • If you have a GMRS license, you may operate on any of the 22 channels with the maximum power shown on the chart.

Each NET team is assigned a channel from 2-7. Channel 1 is informally recognized as a national calling channel for emergencies. Using the shared FRS/GMRS channels allows for teams to have both unlicensed and licensed team members. The non-licensed members are restricted to low power while the licensed members may use higher power.

Ninety-nine percent of today’s consumer handheld radios cover both services. The exceptions are GMRS-only radios which we’ll cover below. All of the dual-service radios automatically reduce power on the FRS-only channels 8-14. On the shared FRS/GMRS channels 1-7 however it is the user’s responsibility to use low power if they are not licensed. While it is simple to do, each manufacture has a different way to do this. Some radios (newer Motorola models) have two PTT (Push-To-Talk) buttons – one for low power and one for high power. Nice and simple. Other radios (Midland, et al) have a menu option to set power level on a channel-by-channel basis.  It seems that these radios come from the factory with the default power level set to high. If you are not licensed, you will need to consult your radio manual on how to reduce power on the shared channels.

One caveat: A few older dual-service radios do not have the ability to reduce power on the shared FRS/GMRS channels. Unfortunately, this renders the radio useable to GMRS-licensed members only. If you think you may have one of these radios, your team ARO may be able to help you check if you are concerned.

Of course, in an emergency involving the threat of life safety or imminent property damage, you may operate on any channel with any power level.

The Ideal Radio

Manufacturers offer a huge range of FRS/GMRS radios. The choice is staggering and the selection seems to change monthly as models come and go. Prices range from $25 to $150. How to choose? While Portland NET cannot officially recommend any particular radio, the RTL (Radio Training Liaisons) have pooled our collective wisdom and come up with the following suggested feature set and a list of radios that come close to meeting them.

Suggested features:

  • Supports both low and high power
  • Weather resistant or waterproof
  • Supports multiple battery options, particularly AAs
  • Includes earbud/mic
  • Desktop charger
  • FM and NOAA reception
  • Repeater capable


Motorola T4xx/T6xx series Motorola MS350R/MS355R Midland GXT series
Supports low/high power yes yes yes
Weather-resistant or waterproof T4xx weather-resistant
T6xx waterproof
Waterproof Weather-resistant
Supports AA batteries yes yes yes
Includes earbud/mic T465 only MS355R yes
Desktop charger T480
Others use wallwart
yes yes
FM and NOAA reception T480 FM+NOAA
Others NOAA
NOAA NOAA
Repeater capable no yes no

The GMRS-Only Option

As of late 2016, there are two GMRS-only radios. Basically, a GMRS-only radio gives up the ability to transmit on the FRS-only channels (7-14) but retains the shared FRS/GMRS channels and gains the options of higher power and use of an external antenna. Both can significantly increase the available range and could be useful for teams needing more geographic coverage.

The Midland MXT100 is a mobile GMRS-only radio with five watts and a magnetic-mount external antenna. It does not contain batteries but uses a cig-lighter plug for powering off a vehicle 12v system. The radio is quite small and includes a quick release bracket for easy vehicle changes. Here’s a link to an earlier, more detailed NET review.

The BTech/Baofeng GMRS-V1 is a handheld GMRS-only radio. It has the ability to transmit on any GMRS channel including GMRS repeaters. It can also be programmed to receive VHF/UHF ham, public service, NOAA, and FM broadcasts. It has a replaceable antenna. It is also a 5-watt radio. Many battery, antenna, and earbud/mic options are available.

What About the Baofeng UV-5R and Their Ilk?

As they say, “It’s complicated.” Basically, the UV-5R is not FCC accepted for either FRS or GMRS. While it is possible to program the UV-5R to transmit on FRS/GMRS frequencies, it is illegal to transmit on those channels except during an emergency. That little caveat is why many NET AROs have a UV-5R in the radio stash. NET AROs can use the UV-5R as their ham handheld and monitor FRS/GMRS channels at the same time. They typically have a regular dual-service FRS/GMRS handheld for transmitting on the channels. If push came to shove in an emergency, they could use the UV-5R for FRS/GMRS as well as ham.

GMRS Repeater Notes

The FCC allows for repeaters in the GMRS service. A GMRS repeater can dramatically increase the coverage area. There are currently no GMRS repeaters in the Portland area although several NET teams in geographically challenging areas are considering them. If anyone is interested in the topic, a good resource is myGMRS.

Written by: John Beaston, Overlook NET, K7TY, k7ty@arrl.net

Gear Review: Midland MXT100 GMRS Radio

Gear Review: Midland MXT100 GMRS Radio

The Midland MXT100 is a GMRS-only radio. The manufacturer’s list price is $150, but is currently listed on Amazon for $119. Locally you can find it at Bimart for $130.

FEATURES

(from Midland website)

  • Full 5W Radio + External Magnetic Mount Antenna for extended range
  • 15 High and Low Power (GMRS) Channels *FCC License Required
  • 142 Privacy Codes to block other conversations
  • Channel Scan (to monitor radio activity) with Controlled Frequency Synthesizer
  • High-Grade Microphone
  • Silent Operation when beeps/tones are not desired
  • Flip-Frame Detachable Mount to install on or under dash
  • High Contrast (back-lit) LCD for daylight or night use
  • 12 V Car Power adapter (included)

CONDITIONAL RECOMMENDATIONS FOR NETS: 

  • Unlike FRS/GMRS handheld radios, this is a GMRS-only radio. A GMRS license is required, which costs $65 every five years and is good for all family members.
  • Supports only GMRS channels (channels 1-7 and 15-22). FRS-only channels (channels 8-14) are not supported. This may limit some teams on their channel selections.
  • Recommended for NET Amateur Radio Operators (AROs) operating from home, at a fire station, or in a vehicle. It would be a good complement to a FRS/GMRS handheld. The ARO needs to have a GMRS license in addition to their ham license.

GOOD THINGS:

  • It’s very compact and would be easy to mount in a car. It’s much smaller than mobile ham radios. It includes a quick-release mounting bracket so it could be easily removed when not in use.
  • 12 volt powered – no internal batteries. Included cigarette lighter plug allows for easy in-vehicle operation and quick swapping between vehicles. Could also use larger capacity external 12-volt batteries. You don’t have to worry about AA/AAAs.
  • Higher power than handhelds (5 watts vs 2-3 watts). Gives a practical range of 3-4 miles when communicating with handheld radios. Handheld-to-handheld range is typically 1-2 miles. This was tested within the Overlook NET area.
  • External magnetic mount antenna allows for easy placement on a vehicle roof or other metallic surface. The included antenna is quite a bit better than those on handheld radios. You could also use many ham base station UHF antennas.
  • Very easy-to-use. No channel programming needed as with some general UHF mobile radios.
  • Fast channel scanning speed. And individual channels can be included or excluded from the scan, so the team’s main and backup channels could be scanned without needing to listen to other channels.
  • Good build quality.

NOT-SO-GOOD THINGS:

  • No support for GMRS repeaters.
  • No support for FRS-only channels (8-14). It is a GMRS-only radio.
  • Quite a bit more expensive than even the best handheld FRS/GMRS radios.
  • Not compatible with regular external speaker/mics. However, the included microphone seems quite good and there’s a connector for an external speaker.
  • The display is small and a bit hard-to-read even with illumination turned up.
  • No automatic power-off, so it could drain the external battery if you’re not careful. Most handhelds have an automatic power-off setting.


Written by: John Beaston, Overlook NET, K7TY, k7ty@arrl.net

Credit: Thanks to Marino KG7EMV for the loan of the radio.

Equipment Tips and Tricks: Recharge Your Batteries

Equipment Tips and Tricks: Recharge Your Batteries

In this episode of Equipment Tips and Tricks, I talk about recharging your batteries. I talk about hybrid rechargeable batteries, smart chargers, and show off a neat piece of kit for storing them.

Equipment Mentioned in this Video

Full Transcript of the Video

Hey there Portland NETs and everyone else interested in community emergency response equipment tips and tricks—my name is Taylor. I’m a volunteer with the Kenton-Arbor Lodge Neighborhood Emergency Team in North Portland Oregon. Today I’m talking about recharging your batteries.

A lot of us are using rechargeable batteries in our kit. These Nickel-Metal Hydride batteries are all over the place. Supermarkets and connivence stores as well as big-box your regular electronic retailers. So, what’s the person to buy?

Well, the batteries you want to buy if you’re looking for rechargeables are going to be Nickel-metal Hydride. There might be some Lithium cells out there on the market, but by-common, you will find NiMH or Nickel-metal Hydride batteries.

Now, specifically, you should be thinking about picking up the versions that are marketed as hybrid batteries. These have a different chemical structure which allows them to retain their charge while they’re just sitting there on the shelf for quite a long time.

The most known brand of these are called Eneloop. That’s their logo! Although you’ll find others, such as these Rayovac Hybrids, on the market. You can go online and find all sorts of reviews. In the end, it’s the shelf-stableness of them that you’re going for. They’ll kind of sit there with their charge for a good couple of months. Unlike normal Nickel-metal hydride rechargeable which will deplete very quickly sitting on a shelf. So that’s the batteries you want.

Now, how do you store them? Well, I love these little carriers. They’re kind of on the spendy side, but so convenient. And what really makes them nice for rechargeables is that you can use them to determine, at a glance, whether that rechargeable is charged or depleted. How I do this is I store them with the positive terminal down if they’re charged. And when they’re depleted, you just flip it the other way and at a glance, you can quickly see which of your batteries are good to go and which you need to replace.

Of course, there are lots of different to store your batteries –whatever works for you. Just make sure you’re not contacting them so they create a short circuit and y’know, blow up or something.

The last thing you’re going to need is a charger. Again, lots of chargers on the market. What you want to look for is a smart charger. Something that can really detect the voltage on that battery and condition it over time to make it last as long as it can.

So this is one such variety. This is made by LaCrosse. There are lots of different models out there. Basically a smart charger is always going to have some sort of screen to tell you what’s going on with the charger. You’ll be able to see that, perhaps the current — how much current is being put into the battery at any time. Slower is better. Fast chargers are not as good. And you might be able to set it to be a refresh or recharge mode, which will completely drain the battery and then charge it all the way back up to get it’s maximum potential.

So, again: Hybrid batteries. A good way to store them. And a smart charger.

Choosing rechargeable batteries for your emergency kit is a personal choice. I prefer to use rechargeables on the things that I use on a constant basis such as my headlamp or that I have sitting around for radio usage or something to that effect. In my actual emergency kit — the one that’s in the garage kind of stored away—I have just regular alkaline batteries sitting there. And that way I don’t have to worry about them going bad for tens of years, rather than just in a couple of months. Also, alkaline batteries a lot less expensive so I can have a larger supply sitting there, without needing to invest in so heavily in the rechargeable batteries.

If you have anything to add about this topic, head on over to YouTube—that’s where we’ve got the comments—of course you can subscribe there as well. And as always, Portland, keep Portland prepared at portlandprepares.org. I’ll catch you next time.

Equipment Tips and Tricks: Listen to your Radio

Equipment Tips and Tricks: Listen to your Radio

In this episode of Equipment Tips and Tricks, I share my preferred set-up to get audio from the radio into my ear. It allows me to operate the radio without interfering with whatever I’m working on and without compromising the ability to hear the environment around me.

Equipment Mentioned in this Video

Full transcript of the video:

Hey there Portland NET and everyone else interested in community emergency response equipment tips and tricks.

My name is Taylor. I’m a volunteer with the Kenton/Arbor Lodge Neighborhood Emergency Team in North Portland, Oregon. I’m talking about listening to your radio or, more specifically, how to get the audio from the radio into your ear where it’s most effective.

Right, so I’ve got the two radios I deploy with:My ham radio, Baofeng portable (er, handheld) and my Motorola Talkabout FRS/GMRS. The one thing these two radios have in common is that their speakers… not so great.

These speakers will work fine in a controlled environment, such as this studio, your house, inside of a car… But as soon as you get and you’re deploying to something—people are talking, sirens are happening, whatever else is going on in your environment—you’re quickly going to have this audio drowned out.

Furthermore, you put the radio down on your hip or somewhere out of the way and the speaker’s pointed in the wrong direction. So, we need a method to get the speaker audio closer and ideally into our ear.

Lots of different solutions for this. I’m going to describe the one that works best for me. And it starts with what’s called a speaker microphone, or speaker mic. And it looks like this. Really inexpensive on Amazon, we’ll pop some links for it over on http://portlandprepares.org if you’re interested in getting a direct link.

But basically, this is an extension cord for the speaker and microphone on your radio. Plug it into your radio and you’ll hook this wherever you want. Now keep in mind that the plugs on here are proprietary to the radio. This is a 2-prong plug for Baofeng and Kenwood, but there’s lots of different varieties. And I can’t plug this into my Talkabout FRS radio — I need a different speaker mic. That’s the way things are.

So we’ll put this into our radio and we’ll hook this wherever we want. These vests actually have a neat loop like this and you can put the radio there if you want. I prefer it here, right in front of my shirt. Some people hook it to their backpack straps. The problem with that is that if you take off your backpack to get into the gear: radio goes all over the place.

Now this is an effective extension cord for the speaker and microphone, but it’s still not in our ear. Which means it can still get drowned out pretty readily. So, the bottom of this speaker microphone has a 3.5 millimeter jack or 1/8 inch jack for a listen-only headset. It basically says: use this for the microphone, take the speaker and put it somewhere else.

Now for that, I prefer an earpiece something along the lines. This is what’s called an acoustic tube listen-only earpiece. This is the acoustic tube, this clear part. It doesn’t need to be clear—that just makes you look like a secret agent.

And on the end of it, you can have any sort of ear attachment. So they make ones that go into your ear, they make foam earplug versions. This one is called an open-ear insert. It’s open because it allows audio from around you. All of the ambient noise of what’s going on to still get into your ear as well as injecting your radio audio.

It’s also nice because it puts the speaker for this down here. Which means the whole earpiece part is very lightweight. This is super comfortable to wear all day. And you can route this other end of it however you want. Down into your collared shirt, whatever.

So that’s the setup I prefer to use. As always, use what works best for you and test your equipment out. Get all your gear on, go walk around the neighborhood, go on an exercise with your team, whatever it takes to make sure your stuff is going to work in a real emergency.

As always: keep Portland prepared at http://portlandprepares.org. If you want to add to this conversation or tell us what gear you like to use, head on over to YouTube we’ve got the comments there and, while there, you can also subscribe to the rest of these videos and get them as they come in.

Thanks for watching, we’ll catch you next time!